At the end of a long day having a wonderful crafting experience arrive in my mailbox all pretty containing everything I need to make beautiful projects is perfectly delightful. There are days when I feel the desire to be creative but just don’t have a creative thought running around in my head-these are the days that are perfect for that wonderful box of fun to arrive. Or the days when I just need a tad bit of inspiration to jump start my imagination- that pretty orange box does the trick. Sometimes I want to create something but don’t feel I have the time to set everything up. For some, space can be an issue- dragging out all your crafting supplies to make a card doesn’t seem worth the effort when it all has to be put back when you’ve finished. That’s why I love my Paper Pumpkin (by Stampin’ Up). It arrives monthly in my mailbox – a pre-designed, pre-cut, all inclusive crafting kit! The cute orange box It is portable, provides instructions and includes everything you’ll need but scissors! Here is what each box contains:
pre cut and scored card bases
die cut images
card front elements
ribbon or twine (typically)
embellishments (sequins, rhinestones, etc)
tags or layers for sentiments
adhesive dots to adhere die cut images and layering elements
Stampin’ Dimensionals
coordinating stamp set
envelops
Stampin’ Dot Ink Pad
Photographic image directions
I can’t tell you how excited I get each month to receive mine. It’s one thing that I look forward to coming in the mail!
The cards (and projects) that Stampin’ Up!’s designers create are beautiful. However, sometimes I’ll choose to create something a bit different than what was intended. I have several customers that take what is in the beautiful orange box and create something all together different or simply tweak the original design to make it their own. Paper Pumpkin allows for that! Here are some pictures of creations of a friend of mine, Jenni Russ, from her Manly Moments June 2018 Paper Pumpkin! She used the products included in the kit and put them together in her own unique way! Take a look:
All the images are copyrighted by Stampin’ Up!
Paper Pumpkin is a solution to so many of my crafting problems!
It allows me to take my crafting on the go with me- everything is neatly packaged in the pretty orange box!
It provides step by step instructions to create lovely cards.
It is flexible enough to allow me to modify the designs so I can express my creativity!
This is the upcoming Paper Pumpkin for the month of August:
This kit has the supplies to create nine cards. This month the box is designed to be a keepsake box to hold reminders of your favorite memories. It is focused on promoting connection between people- friends and family- old relationships and new! The colors in this kit are: Blackberry Bliss, Bumblebee, Melon Mambo, Petal Pink, Pool Party, and Poppy Parade. August is a great month to try it out!!!
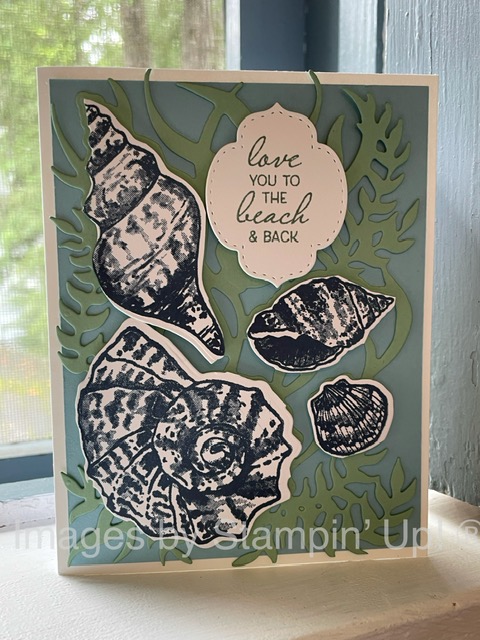
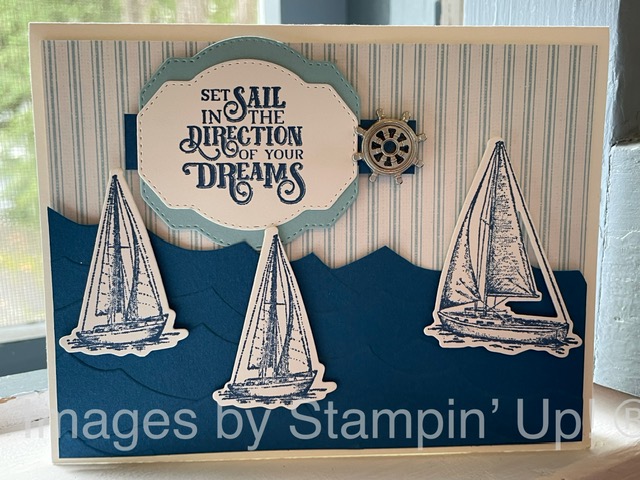
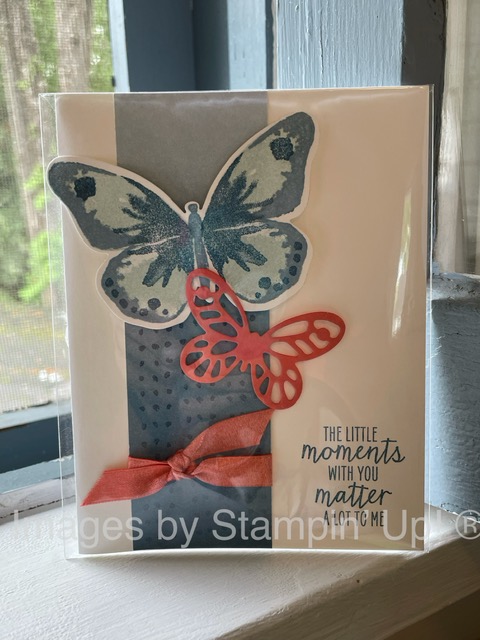
The beach is one of my favorite places to be. It speaks of summer and vacation time and warm weather and friends and family. All things I love! After a very rough year teaching, summer is my time to relax and enjoy the beauty of nature. The sand, sun and the blues of the water and sky all give me a sense of peace. So I love to create cards that evoke the feeling of the beach! The best way to do that is to use color! These are the 5 best colors to keep you in the summer mood! The calming effect of the blues give the feeling of rolling waves on a lake and the sweet breeze blowing in the afternoon sky. These colors used together bring a sense of calm and peace yet they can also energize you. Here are a few cards that use a color or two of the colors that remind me of the beach.
My love of the beach brought me to these colors and the inspiration that I found in them but your inspiration can come from any of the things that you love, a favorite shirt, a painting, the décor of the restaurant you went to or even from a catalog or ad. Look around, find the things you find pleasing and look at the colors and create a card with those colors!
It seems as if the world is full of negativity, hard times, and bad stuff. Sometimes it is simply our perspective on the situation. And sometimes it is that bad things are happening! Even when we experience challenging things or hard times seem to be all around us, we can choose to look at it all from a different vantage point. This is true not only in the world around us but it is true when looking at our crafting.
Let’s look at some products and how we use them with fresh eyes. Let the creative juices flow. Start looking at the negative pieces of dies. Look at the images in your stamp sets; turn the images around, upside down, sideways, and see if it sparks some creative thought. What can you do with an image that is outside the box? Use a punched image in a new way by trimming it up. What sets can you combine to create a new and different image, product or project?
Using the Negative
Consider using the pieces left over when you use dies. The dies I used were from the Stitched So Sweetly set. The negative images from the largest rectangle and the second largest rectangle formed the double frame for this card. I made sure that I centered the dies in the middle of the pieces of cardstock. The best part of this is that not only did I have the frame images I created but I was also left with the rectangle die images to use on another card.
First I cut a 4 x 5 1/4 piece of Gorgeous Grape cardstock and used the largest stitched rectangle To create the double framed effect I took another piece of cardstock of the same size (4 x 5 1/4) in Highland Heather which is a lighter shade.
I kept this die cut image to use later. The card base is 81/2 x 5 1/5 in Whisper White. To ensure I was stamping within the window space I set the smallest window frame on top of the Whisper White to get a visual idea of where to stamp. I removed the frame and then I inked the large flower image from Beautiful Friendship (149252 $22 USD) in Gorgeous Grape ink and stamped it in the center of the Whisper White cardbase. I used Crushed Curry ink on the interior image of the flower (piston’s perhaps) and Pear Pizzazz on the leaf images to add some dimension and interest. Next, I adhered the two frame layers to the cardbase using Stampin’ Dimensionals making sure the larger rectangle is on the top.
I threaded the Bumblebee Gingham ribbon (153658 $7 USD) through the top frame layer and tied it in a knot. I chose to do a knot but a bow would look cute here too. The color contrast between the Gorgeous Grape and the Highland Heather worked perfectly for the negative images that created the double frame. This card turned out beautifully! Talk about turning a negative into a positive!
Upside Down
Sometimes you need to look at an object with new eyes to see it in a different way. For this card I used a die from the Smooth Sailing die set (149576 $32 USD) . Can you tell which die cut piece is from this set? This die set coordinates with the Sailing Home Stamp Set(149457 $24 USD). Do you see it? It is the smaller sailboat turned upside down to create the ice cream cone in Crumb Cake. Then I used an embossing folder (not yet available- ssh! It’s coming out in the August-December Mini Catalog) to give the cone texture.
I used a circle from the Stitched Shapes die set (152323 $30 USD) to create the ice cream scoops in Blushing Bride, Mint Macaron, and Calypso Coral (all from the Subtles Collection) and the Stitched So Sweetly die set (151690 $32 UDS) for the rectangle in Soft Sea Foam. The printed paper is our Flowers For Every Season Designer Series Paper (152486 $11.50 USD) and it is a great deal; you receive 48 sheets of 6×6 paper. There are 4 each of 12 double-sided designs. The beautiful designs are floral and geometric in this pack which is why I chose this to accent the card. The darker blue is one of our new In-colors; Misty Moonlight. The blue green is Just Jade which is also a new In Color! Don’t they make the card pop?
See that cute ribbon on the bottom? It is also Misty Moonlight from the Flowers For Every Season Ribbon Combo Pack (153620 $10 USD). This pack comes with three different ribbons: Just Jade Gingham Ribbon, Whisper White Faux Linen Ribbon, and Misty Moonlight/silver Baker’s Twine (which was used here). I created the sweet Happy Day tag using the Lovely Labels Pick A Punch (152883 $23 USD) to trim both ends of the Whisper White cardstock. Then I inked up the Happy Day stamp from Itty Bitty Greetings (151331 $36 USD) in Calypso Coral ink and stamped it in the center of the tag.
The content in this blog is the sole responsibility of Christy Woods as a Stampin' Up!® Independent Demonstrator. The use of and content of classes, services or products offered is not endorsed by Stampin' Up!