As I write this blog I am sitting in a hotel room about to embark on my scrapbooking weekend! And the weather here this past few weeks has been crazy! Last week I had two days off of school due to the extreme cold (air temperature in the negatives and wind chills in the double negative digits) but then the weekend came and the temperatures topped off at 58 degrees! Then it got cold again but only into the low 30s and then it actually hit 60 yesterday. But today I woke up to 27 degrees and the temperature falling throughout the day with 40 mph wind gusts! The winter doesn’t seem to last too long when you get a day here or there that feels like spring! However, you know it’s actually spring when you see the flowers popping their beautiful heads through the dirt that has been frozen and covered in snow for way too long!
There is nothing like looking forward to Spring when you are in the midst of the wild winter weather! Creating a beautiful flower featuring card will lift your spirits for sure! Why not create a beautiful card to share that feeling with someone else who could use a pick up during this difficult season!
Stampin’ Up! has so many stamp sets and Designer Series Papers to help you create just the right card for you! In addition to all the items in the Annual Catalog and the Occasions Catalog there is also a new free Sale-A-Bration offering that will give you a flowery feel – the Painted Season Bundle available in the Second Release Sale-A-Bration Catalog!
Watch this video to get an up close look at this bundle.
Oh Boy! I’ve just updated my catalog page! Wow does Stampin’ Up! have a lot to offer right now! I love this time of year when I can stock up on the products that I use all the time and earn free products! For every $50 you purchase, you earn free Sale-A-Bration items and if you need a lot of items and your total reaches $150 you will even earn Hostess Rewards!! Here are the things that I stock up on to get the most out of this time of year:
1. Envelops – You always need envelops to send the beautiful cards you
created.
Very Vanilla (107300) $7.00 for 40
Whisper White (107301) $7.00 for 40
Clear (102619) $5.50 for 50
2. Neutral Cardstock – This is something to always have on stock!!
Glossy White (144240) $7.75 for 10 sheets
Shimmery White (101910) $9.00 for 10 sheets
Very Vanilla (101650) $9.75 for 40 sheets
Whisper White (100730) $9.75 for 40 sheets
3. SNAIL Adhesive– You always have to secure your layers onto your card
base!
SNAIL Adhesive (104332) $7.00 (13.1 yards)
SNAIL refill (104331) $4.50 (13.1 yards)
4. Dimensionals– Make your images pop up! I go through more of these than
any other Stampin’ Up! product!
Stampin’ Dimensionals (104430) $4.00
Mini Stampin ‘ Dimensionals (144108) $4.00
5. Tear & Tape Adhesive – This is super strong adhesive perfect for making
boxes and 3D items! (138995) $7.00
6. Ribbon and Trim – Annual Catalog – p.200-201 Ribbon and trim makes
every card just a bit more special! Our ribbon is always a good deal!
7. Designer Series Paper–
This is a great item for not only cards and boxes but
for scrapbooking. Annual Catalog p.188-189
8. Reinkers! Which of your stamp pads needs a refreshing? It’s probably
your favorite color or one of the lighter colors you use often. Annual catalog
p.183- 187.
9. Embellishments – Dazzel it up with Metallic Pearls or Basic Jewels.
Perhaps you are more of a Faceted Gems kind of gal or a Glitter Enamel Dot
fan! You can find just the right embellishment on page 197 of the Annual
Catalog.
10. Stampin’ Mist Stamp Cleaner – Have you purchased a refill bottle? It’s a
great value and something you don’t want to run out of!
Stampin’ Mist Stamp Cleaner refill (101022) $9.50 for 8 fl oz.
Stampin’ Mist Bottle (102394) $4.50 for 2 fl oz.
In addition to stocking up on the essentials, it is a good idea to look ahead to occasions you may have in the near future. For example, my oldest son is graduating this June and I will be making decorations for his graduation party as well as the graduation announcements and the invitations to his party. While I’m not sure exactly what the invitations or decorations will look like, I know the color scheme that I will be using. I’m stocking up on Night of Navy and Whisper White with a few other accents like the Silver Foil Sheets and the Shimmery White cardstock. What do you have coming up that you could prepare for now?
Check out the catalog page on this sight to view all the different Sale-A-Bration items available for free for every $50 you spend (before S&H and Tax). And as always, contact me for any help you may need!
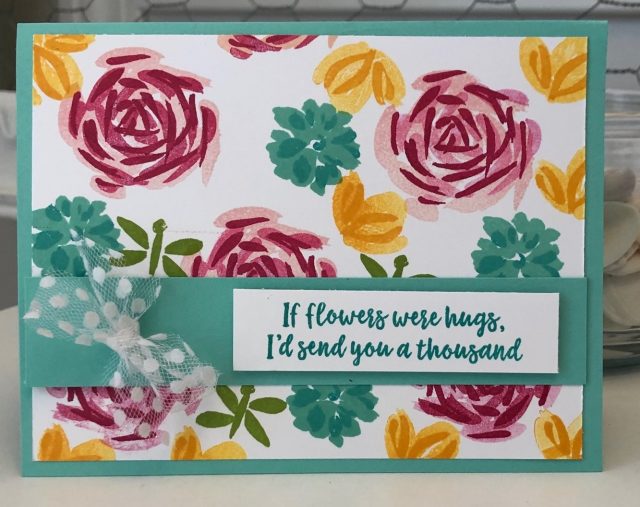
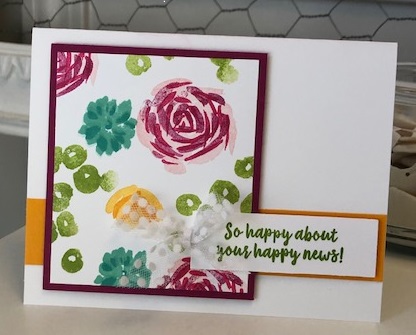
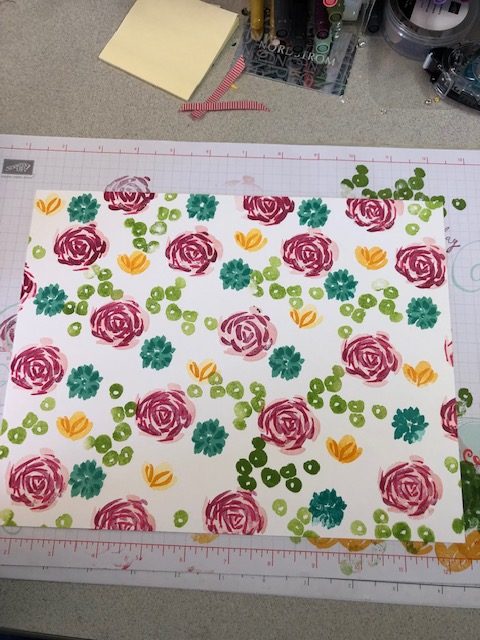
Adding interest to your cards can be done in many ways! One great way is to add background images. You can do that by using Stampin’ Up!’s Designer Series Paper or you can create your own! These cards were created using background paper that I created. One major benefit is that you can custom coordinate the colors in your background cardstock.
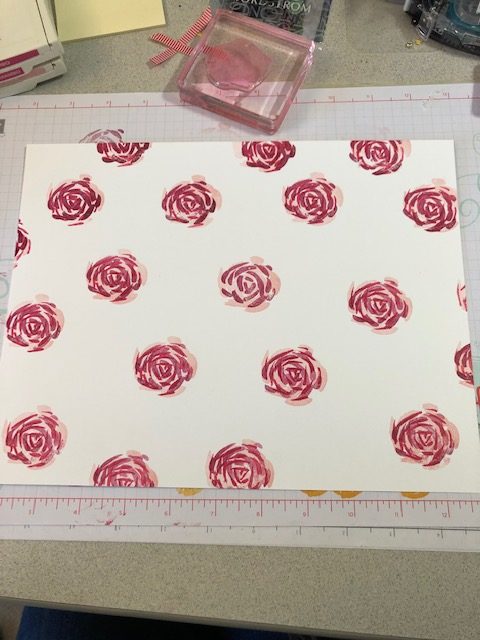
To start off choose a neutral cardstock and a stamp set that works best for the look you want. If you choose a line-art stamp set (one that you would color in) it would give you an interesting black and white look or a single color look. If you choose a solid image stamp set, you can easily add color. An even better way to add a lot of color is to use a two-step stamp set like the one I used here (Abstract Impressions). Next you will need to choose the size of cardstock you want to use for the projects you have planned. Here I chose 8 1/2 inches x 11 inches Whisper White cardstock.
If you are choosing to use multiple images for the background, start by stamping the largest image repeatedly on the cardstock being sure to leave space to stamp the other images you are planning on using. Here I have stamped the first of the two-step image of the rose from Abstract Impressions in Blushing Bride ink. Next I stamped the second image of the two-step image using Lovely Lipstick that was stamped off one time to give it a lighter shade. Then I stamped the third image of rose in a full on inked image in Lovely Lipstick.
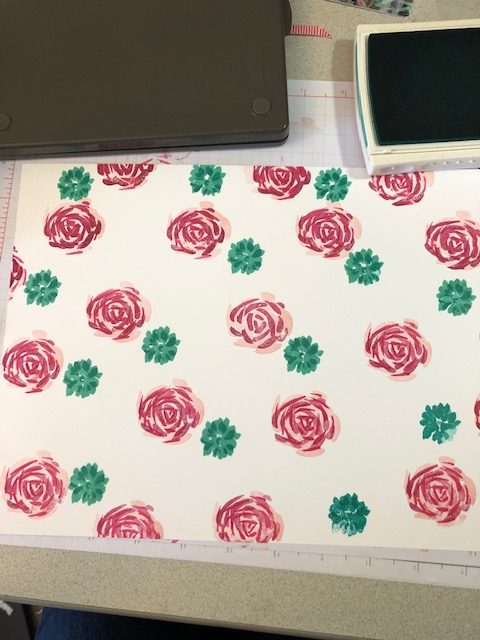
The second image I stamped was a smaller flower image. Again with this two-step image, start with the lighter shade and then in the darker shade. Here I stamped in Costal Cabana and then in Bermuda Bay. When stamping this second image I left space for the next two images I was planning on using.
I stamped the last two-step image in Mango Melody. The first image was stamped off so that it would be lighter and then I stamped the second image in full strength Mango Melody. I finished the background paper by stamping the final image in Granny Apple Green. Once the full sheet is done simply cut the pieces you need for the cards you are creating. Set aside the rest to use for future cards!
The content in this blog is the sole responsibility of Christy Woods as a Stampin' Up!® Independent Demonstrator. The use of and content of classes, services or products offered is not endorsed by Stampin' Up!